How to Maintain Metal Siding

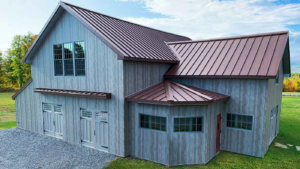
Metal wall panels can enhance the aesthetic of any home design. They are highly versatile, durable, and require minimal maintenance.

Since steel is conductive, electrical safety must be taken seriously when working with it. Use heat-reflecting paint to keep metal surfaces cool and avoid hazardous arc flashes. This also helps the siding last longer. Contact Metal Siding Montana now!

Metal siding is one of the longest-lasting exterior cladding options. Unlike vinyl, it won’t fade or crack in intense heatwaves or icy winters and will retain its vibrant appearance with minimal upkeep. It’s also a great energy-efficient material, reflecting the sun’s rays to keep homes cool during summer and warm air inside during winter. This translates to lower energy bills and a smaller environmental footprint.

Homeowners today prioritize low-maintenance materials and sustainable solutions, and this is where metal siding shines. It’s manufactured using recycled materials and is fully recyclable at the end of its lifespan, reducing the need for natural resources and contributing to the preservation of the environment.

This sturdy and versatile siding option can match almost any design style, from the sleekness of urban lofts to the warmth of rustic countryside villas. It can be combined with wood or stucco to create a distinctive exterior, or complemented by other traditional features like windows and doors.

As with all exterior materials, proper maintenance is key to prolonging the life of metal siding. This includes periodic cleaning to remove dirt and dust buildup, which can reduce the effectiveness of the weatherproof coating. It’s also a good idea to conduct bi-annual inspections to check for signs of damage or wear and tear, such as scratches or dents. Addressing these issues early on can prevent them from escalating into more severe and costly problems down the road.

Metal siding can also be repainted as needed to refresh the color and protect against corrosion. A wide range of colors is baked into the cladding at the factory, and even steel siding that looks like a wood grain can be repainted with a Kynar-based PVDF paint system that offers up to 40 years of chalk and fade resistance.

If you’re considering switching to metal siding for your new home, contact a local professional to learn more about the options available and discuss your unique building needs. They’ll help you select the right thickness for your home, as well as a color that perfectly complements your design. They can also advise you on any local or state restrictions that may affect your project.

Durability

Durability is a key feature that distinguishes metal siding from other construction materials. It offers strong defense against harsh weather conditions, such as intense heat waves and icy winters, while resisting rot and pests. This sturdy material also provides energy-efficient properties by reflecting sunlight, keeping homes cool in summer and warm in winter.

If properly maintained, metal siding can last several decades, outliving many other construction materials. Nonetheless, it can be dented if struck by a solid object and can be scratched if exposed to abrasive surfaces. A simple way to decrease the chance of dents is to use a lower gauge metal, which is thicker and able to endure more force than thinner material.

Steel and aluminum are popular choices for siding, with galvanized steel being the most common option. A layer of zinc protects the underlying aluminum to prevent corrosion and increase longevity. Other materials that are often used in building construction include copper, stainless steel, and galvalume, a mix of aluminum, zinc, and silicon that increases the corrosion resistance of other metals.

Corrosion-resistant metals are ideal for coastal areas, as they withstand high humidity and salt content better than other types of metal. However, if you aren’t sure whether the type of metal you choose is suitable for your location, ask your contractor or consult a specialist in order to make the best decision.

In addition to its durability, metal siding is a versatile material in terms of design and style. It comes in a wide variety of colors, textures, and patterns to match any home aesthetic. You can also find different panel styles, including flat and shingle-like, to achieve the look you’re after.

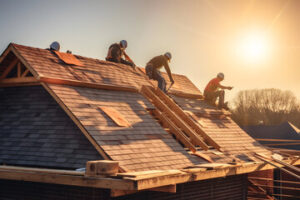
The only drawback of metal siding is that it is heavier than other construction materials and requires special equipment for installation. This can add to your total project cost and extend the timeline for its completion. However, you can minimize this issue by choosing a trusted metal siding contractor that has experience working with steel. This way, you can be sure your home is built with the best possible materials and will look beautiful for years to come.

Recyclability

Many homeowners are prioritizing low-maintenance materials and sustainability, which is one reason why metal siding is gaining in popularity. This durable material is also highly recyclable and offers a beautiful aesthetic to any home. It also protects your building from harsh weather conditions, which is why it’s a popular choice for coastal areas and areas with harsh sunlight or rainy seasons.

Unlike other siding materials, which can dry rot or absorb water and develop mold and mildew, metal stands firm against harsh weather. It’s also non-combustible, making it a safe and fire-resistant option for your building. This is especially important in a coastal area where a fire could spread quickly.

When it comes to the longevity of metal siding, it can last for decades with little to no wear and tear. Most manufacturers will offer a warranty for their products, which is a great indicator of how durable and long-lasting they are.

Another advantage of this material is that it’s easy to maintain. You can use a caulking gun to seal small cracks where panels meet or around windows and doors, and you can wash your metal siding gently once a year to remove dust and debris. If you notice that your siding is beginning to rust, you can clean it with a metal wire brush and then paint it with a rust-inhibitive primer before restoring the original color.

One downside of metal is that it’s not as insulative as some other siding options. It may require the addition of an extra layer of insulation to prevent your home from losing heat and energy. But this is a small price to pay for the longevity of your siding and the protection it provides your building.

If you want to add a metallic accent to your building, you can find many different styles and finishes from various manufacturers. For example, Quality Edge offers a steel planking system with a wood grain finish to complement any design style. Similarly, McElroy Metal has an impressive selection of colors and designs to choose from. In addition, you can find options that are made from recycled materials and are 100% recyclable, which is a great way to support the environment.

Maintenance

Metal siding and roofing provide enduring beauty and durability, enhancing the unique architectural features of your home or commercial building. However, it is important to understand the maintenance requirements of this type of siding to prevent damage and extend its service life.

Like other types of exterior materials, metal requires periodic cleaning to keep it looking its best and ensuring that the material is in good condition. Periodic inspections are also necessary to spot problems before they become serious. This includes checking for any signs of corrosion, such as rust spots or water leaks. Ideally, these inspections should be done at least twice a year.

Most metal siding is available in either aluminum or steel, although it can also be fabricated from copper and zinc. Aluminum is generally lighter and easier to install than steel, and some homeowners may even be able to handle the project themselves with the right tools. However, it’s important to consult with a professional to make sure the project is done correctly and that the correct materials are used.

One of the most common mistakes that can be made with metal siding is improper installation, which can cause issues later on. It is important to follow the instructions carefully to ensure that the panels are anchored securely and that all fasteners are sealed properly.

Another common issue that can be caused by improper installation is gaps in the wall panels, which can lead to moisture leaks and other structural issues. If you notice any gaps in your metal siding, they should be repaired immediately to avoid further damage and ensure the longevity of your siding.

Metal is an extremely durable and low-maintenance material, but it’s important to clean it regularly to prevent scratches and other damage. Regular cleanings will not only enhance your home or commercial building’s curb appeal, but it will also help protect the surface from oxidation and other weathering issues.

It’s also important to keep in mind that metal siding is more energy-efficient than other types of exterior materials, helping to reduce your utility bills and ensure a comfortable indoor temperature all year round. Additionally, this type of siding is fire resistant, which can be a significant benefit in areas prone to wildfires or lightning strikes.

How to Properly Complete a Roofing Installation

A sturdy, new roof protects your home from the elements and provides a strong return on investment. New roofing materials also improve your home’s energy efficiency by reflecting sunlight and reducing utility bills.

Roofing

Getting a new roof can also ensure your manufacturer warranty remains valid. Depending on the type of materials, this could save you thousands in repair costs over time. For professional help, contact Fresno Roof Company.

The roof is one of the most important parts of a home, protecting it from moisture, heat, cold, and debris. It’s also a design element that can enhance the look of a structure and boost its curb appeal. But, a roof needs the right materials to perform its job and stand up to the elements. When it comes to choosing roofing materials, there are many options on the market, and each requires specialized techniques for installation.

A quality roofing job depends on the correct materials and a skilled team. A good contractor will have a full list of necessary materials for the job, including shingles, metal panels, flashing, and other roof coverings. Some of these materials are available in different colors, styles, and textures to complement a home’s architectural style and color scheme.

The first step in a roofing project is to install sheathing, which provides a solid base for the roofing material. This part of the roof is often made from plywood or oriented strand board (OSB). Roofers examine the sheathing from the attic to see if there are any soft spots that need replacing, and they will use this opportunity to inspect the entire roof for rot and damage.

After the sheathing is in place, the roofers can start laying the shingles. This is the most visible part of the job, and a top-notch roofer will make sure the shingles are nailed properly and staggered for maximum protection. He will also apply a layer of flashing around chimneys, windows, joints, and other penetrations. This prevents leaks from ice dams and wind-driven rain.

Other essential roof components include vents, ridge caps, and fascia boards. These are installed at the ends of rafters or trusses to protect them from water damage and to support gutters. Fascia boards are often topped with a layer of caulking to provide additional water resistance.

Lastly, the roofers will install a roof leak barrier to help seal the eaves and valleys of the roof. This product, such as GAF WeatherWatch mineral-surfaced leak barrier, is a great way to protect vulnerable areas of the roof from damaging leaks.

Preparation

The roofers will lay out their materials and tools for the project, preparing the area for an efficient installation. They’ll also plan out the project and its phases, including a timeline for completion. It’s important to have this phase done before the actual roofing begins, as it will help you set your expectations for the work and prevent any misunderstandings.

The roofing contractors will remove the old shingles and underlayment to prepare for new installation. The process is noisy, vibrates the structure of your home and can kick up dust and debris. To protect your belongings and furniture from damage, put away any movable items, such as large pieces of outdoor furniture, or cover them with tarps. The hammering vibrations can knock wall-hung pictures and mementos off walls, so take down these items and store them in a safe place. Wrap fragile decor and knick-knacks in bubble wrap or move them to lower areas of the home.

Make sure to remove anything that is attached to the roof, such as satellite dishes and skylights, or could fall off during the replacement process, such as window treatments, gutters, and chimneys. It’s also a good idea to remove any awnings or decorations from the exterior of your house, as they may get in the way of the roofing crew or be damaged by falling shingles.

If you have a garden or flower beds, it’s a good idea to cover them with tarps and/or netting. This will reduce the risk of lost or dropped shingles and protect your plants from the nails that will rain down during the tear-off. You should also mark any especially delicate or expensive plants so that the roofers know to be extra careful around them.

If you have children or pets, consider making arrangements for them to stay with a friend or family member during the roofing project. The noise from hammers and nail guns can be stressful for them, and they won’t be able to play outside during the construction. Also, debris from the roof can be dangerous for them to play with, so it’s best if they stay away.

Installation

The roofers will remove your old shingles and underlayment, then install the new materials. They will use a caulk gun and roofing caulk to seal raw edges and other leak-prone areas of your roof. They will also put in flashing around chimneys, wood stove pipes, eaves, valleys, and along hip and ridge lines.

Depending on your budget and aesthetic preferences, you can choose from a wide variety of roofing materials, including dimensional shingles for curb appeal, three-tab shingles for cost savings, clay tiles for durability, or metal sheeting for easy maintenance. Your contractor can explain the strengths and limitations of each material to help you make your decision.

Your roof will need ventilation to prevent moisture build-up, regulate your home’s temperature, and reduce energy costs. Your roofer can add or replace attic vents, gable vents, ridge vents, and soffit vents to improve your roof’s performance. They will also apply a drip edge to protect the underside of your roof from water intrusion. They will also install ridge cap shingles, which cover the ridges of your roof for a finished look and extra protection from weather elements. Finally, they will install vents to help keep your attic cool and dry.

Final Inspection

A final inspection is a critical part of closing out a construction project. It confirms that everything was installed and completed correctly, mitigating legal issues down the line. A detailed checklist ensures that no item or structure is overlooked during this evaluation.

The right inspection checklist should be able to meet the unique needs of each project or process. It must be compiled with a thorough understanding of the relevant regulations and standards. This could include industry guidelines, safety requirements, or quality specifications. It is also important to include a section for recording the inspection results. This may be as simple as pass/fail or it could be more detailed, including notes and recommendations for improvement.

During the roofing installation inspection, inspectors should check for a variety of items, such as:

Penetrations, such as skylights or chimneys, create holes in the roof that must be covered by various boots, sealants, or flashing. Inspectors will examine the condition of these penetration seals to ensure they are working properly and up to code. They will also examine the flashing itself, which is thin strips of metal that divert water away from joints in walls and roofs. Inspectors will look for rust or cracks in the flashing, which can be a major source of leaks.

Finally, the inspector will examine the fascia and soffit boards. These are the horizontal boards that run along a roof’s edges and overhangs. They will look for rot, warping, and other types of damage to ensure they are protecting the roof from water and pests. Inspectors will also check the gutters and downspouts to make sure they are free of debris and functioning as they should.

A comprehensive inspection can help prevent costly problems down the road and boost resale value. A contractor can streamline this critical part of closeout by being proactive, familiar with a building authority’s requirements, and taking steps to prepare for the inspection. Preparation includes extensive documentation of the construction process, such as building plans and proof that all previous inspections were passed. A final inspection is a crucial step, so it is important to plan accordingly and request it well in advance of the desired date.

Why Roof Repair Costs Are So Expensive

It’s important to check out your roof regularly for issues such as rotting, moss, and mildew. These are relatively minor problems that can be dealt with fairly quickly.

Roof Repair

Leaks are another issue that should be repaired as soon as possible. The good news is that most leaks are easy to fix, and even more complex repairs can be undertaken by homeowners. Visit https://redstickroofing.com/lafayette to learn more.

The average roof sees a lot of damage from the elements. Sudden storms, high winds, sun exposure and age can all impact the integrity of each shingle. Inspect your shingles regularly, especially after significant storms, to ensure they are intact and free of leaks.

Depending on the cause of the damage, you may need to replace the entire row of shingles or just the damaged ones. Assessing the extent of the damage will help you determine whether to tackle the project yourself or hire a professional. For small repairs, you can use roofing cement to fill in cracks and holes. For a more extensive repair, you will need to remove the old shingle and apply a new one to the roof. Having the right tools for the job will ensure you are safe and successful.

A ladder and safety harness, a sturdy pair of work gloves and goggles, and non-slip footwear are essential for climbing on your roof to make the necessary repairs. A pry bar and a claw hammer are also helpful for loosening the nails holding the shingles in place and removing them. Lastly, a utility knife is useful for cutting shingles to the correct size and shape.

While not all discoloration is a sign of serious damage, it’s important to check for bruising and blistering. These signs of damage appear as bubbling areas where the granules have been removed, leaving the shingle exposed to moisture and compromising its weather resistance. Blistering shingles need to be replaced as soon as possible to prevent leaks from developing beneath them.

Another area of the roof that often needs attention is the vents. Look for cracked housings on plastic roof vents and broken seams on metal vents. Loose and damaged vents need to be repaired or replaced as quickly as possible to avoid leaks and water intrusion.

Finally, it’s a good idea to keep an eye on the neighborhood when checking your roof. If many of your neighbors are repairing their roofs after severe storms, it’s likely that yours is in need of repair too.

Leaks

A leaky roof is not only a major problem for the integrity of your home, but it can also cause mold and mildew issues that can be detrimental to health. Leaks can lead to rotted framing and sheathing, destroyed insulation and water damage to ceilings and walls. Even a small leak can quickly turn into an expensive repair bill.

The first step in repairing a leak is to identify where the problem is occurring. If you have access to the attic or crawl space, you can start by looking for water stains or black marks on the ceiling. If these are not present, you can also use a garden hose to spray the area with water to see if you can find the source of the leak.

Once you have found where the leak is occurring, it’s important to stop it as soon as possible to avoid further water damage and other costly repairs. If you have a vaulted ceiling, you may need to take down the drywall to inspect and remove any wet areas. If you do this, it’s important to protect your belongings and furniture with tarps or sheets.

The next place to check for a leak is around any penetrations in the roof such as plumbing and roof vents, chimneys or dormers. These are the most common places for leaks to develop. Leaks can also occur near skylights, which are often the result of poor installation or decayed insulation.

If you find a leak, you can try to fix it yourself by creating a barrier to stop the water from reaching your home. A simple solution is to lay a piece of plywood across the joists in your attic or crawlspace, and place a bucket underneath it to catch any dripping water. You should be sure to empty the bucket regularly.

Another good way to prevent roof leaks is to regularly inspect the flashing. This is a layer of metal that runs along joints, crevices or vertical surfaces to prevent moisture from entering the home. If you find that your flashing is corroded or missing, it’s important to have it repaired as soon as possible. This will help to prevent a leaky roof from becoming a costly repair job in the future.

Fascia Damage

Soffits and fascia may seem insignificant, but they’re important components of sloped roofing systems. They protect the roof from water damage and provide a mount point for gutters. They also help channel rainwater away from the roof and foundation of the house. If these important parts of your home’s structure are damaged, you may experience a variety of problems that can lead to expensive repairs.

Fascia boards can be made from various materials, including wood, aluminum or vinyl. Over time, any material will deteriorate if exposed to the elements, so regular inspections and maintenance are essential. Look for signs of rot or decay, such as soft spots or discoloration. Cracks in the fascia can signal that the board is sagging, which can further compromise its structural integrity. Peeling or cracking paint is a sign of moisture infiltration, and it’s important to address these issues promptly.

Another common cause of fascia damage is insect infestations. Termites, carpenter ants and bees can all cause severe damage to the fascia when left unchecked. Regularly inspecting your eaves and calling in an exterminator when necessary can help prevent this problem.

If you do notice fascia damage, it’s essential to have a professional inspect the situation and make any necessary repairs. The repair process may involve removing the old fascia and installing new wood or aluminum, or it could simply involve re-caulking the edges of the existing fascia. If the damage is limited to a small section of the fascia, your roofers may be able to fix it without replacing it, as long as the new area of the fascia can support the weight of the gutters and prevent water from entering your attic.

In addition to repairing the fascia, it’s important to keep in mind that any issues with your roof that are not addressed will eventually impact your fascia as well. Clogged gutters can overflow and expose the fascia to water, which can rot or cause other damage to the roof. When a problem like this arises, it’s important to have your roofers address the issue immediately to avoid additional structural damage to your home.

Cost

The extent of the damage and the repair’s complexity play a big role in determining the cost. It takes less time and labor to patch a small leak or nail pop, so it’s cheaper for a roofer to do that kind of work than to replace an entire section of the roof or fix structural damage.

It’s also worth remembering that the cost of a repair can add up quickly. Any additional services like gutter cleaning or the purchase of replacement shingles can increase the overall expense. A homeowner should shop around and get multiple quotes from different contractors. Also, if the repairs are not urgent it might make sense to wait until the offseason when the price of labor is lower.

Some roofing materials are easier to work with than others, and premium or luxury materials can cost more. This is not because they are better quality, but rather because they require a higher level of skill and tools to install. It is not uncommon for a roofer to charge more for the labor involved in working with these types of materials.

A budget-conscious option is to have a roofer inspect the roof and recommend any repairs. A homeowner may also decide to try a DIY project, which could be cheaper. But, if the damage is extensive or the leaks are widespread, then it’s probably best to hire a professional roofer for the job.

It’s also worth noting that home insurance covers some forms of roof damage. This includes storm damage, but it’s important to check your specific policy to ensure that you have coverage for any roof issues. In many cases, homeowners can also get a home equity loan to pay for repairs, which can be an excellent way to save money and still have the roof repaired or replaced as needed. However, this type of loan is typically only available to those with enough equity in their home. The amount of equity required will vary by lender and by state. However, most lenders will require that the borrower have at least 20% equity in their home before they will consider lending them the funds for the loan.